Wednesday, December 26, 2018

spring2-jndi-datasource-conexion

I share example, Spring Boot2 jndi datasource conexion from Tomcat.

Technologies used:

1. Spring Boot 2.0.3.RELEASE
2. Maven 4
3. Java 9
4. Eclipse: Oxygen.1.a Release (4.7.1a)
5. Tomcat 9
6. MySql 5.7.24

Code on GitHub:

https://github.com/HenryXiloj/Spring-boot2-jndi-datasource-conexion


Steps:

1. Create table and insert on table.

CREATE TABLE `user` (
  `id` bigint(20) NOT NULL,
  `name` varchar(45) DEFAULT NULL,
  `email` varchar(45) DEFAULT NULL,
  PRIMARY KEY (`id`)
) ENGINE=InnoDB DEFAULT CHARSET=latin1;

INSERT INTO `user` (`id`, `name`, `email`) VALUES ('1', 'Henry', 'test@gmail.com');
INSERT INTO `user` (`id`, `name`, `email`) VALUES ('2', 'Lucas', 'test2@gmail.com');

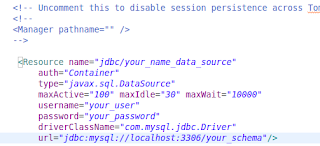
2.  Add in your context.xml (path_your_tomcat9/conf/context.xml).


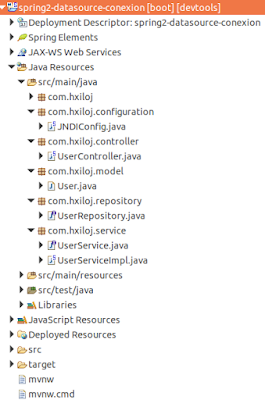
3. Import maven project from eclipse.

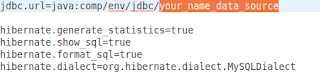
4. edit configuration file application.properties


5. Run  As -> Run on Server


6. Test: http://localhost:8080/spring2-datasource-conexion/user


References:

https://www.baeldung.com/spring-persistence-jpa-jndi-datasource


Monday, December 10, 2018

Spring-boot2-pool-conexion

I share example, Spring Boot2 pool conexion from Tomcat.

Technologies used:

1. Spring Boot 2.0.3.RELEASE
2. Maven 4
3. Java 9
4. Eclipse: Oxygen.1.a Release (4.7.1a)
5. Tomcat 9
6. MySql 5.7.24


Steps:

1. Create table and insert on table.

CREATE TABLE `user` (
  `id` bigint(20) NOT NULL,
  `name` varchar(45) DEFAULT NULL,
  `email` varchar(45) DEFAULT NULL,
  PRIMARY KEY (`id`)
) ENGINE=InnoDB DEFAULT CHARSET=latin1;

INSERT INTO `user` (`id`, `name`, `email`) VALUES ('1', 'Henry', 'test@gmail.com');
INSERT INTO `user` (`id`, `name`, `email`) VALUES ('2', 'Juan', 'test2@gmail.com');


2. Import maven project from eclipse.
3. edit configuration file .yml


4. Run  As -> Run on Server

5. For test: http://localhost:8080/spring2-pool-conexion/user


Code on GitHub:
https://github.com/HenryXiloj/Spring-boot2-pool-conexion

References:

https://www.concretepage.com/spring-boot/spring-boot-tomcat-connection-pool


Friday, December 7, 2018

ERROR 1698 (28000): Access denied for user 'root'@'localhost'

I share solution the next error: ERROR 1698 (28000): Access denied for user 'root'@'localhost'

1. When you create new install mysql use 'sudo' on ubuntu.

2. First connect you db from command line.


sudo mysql -u root

3.


SELECT User, Host, plugin from mysql.user;

if you check User 'root' have 'auth_sockect' update to 'mysql_native_password'

4. in your case User='root'


5. FLUSH PRIVILEGES;
6. exit;

Try again.


References:

https://stackoverflow.com/questions/39281594/error-1698-28000-access-denied-for-user-rootlocalhost

Thursday, December 6, 2018

Example consuming Gmail API

I share basic example, how to integrate Gmail API with Gradle

Technologies used:

1. Spring Tools Suite
4. Gradle 3.4.1
5. Java 8
8. Eclipse: Oxygen.1.a Release (4.7.1a)

Code on GitHub: https://github.com/HenryXiloj/api-gmail

Steps:

1:

Create credentials:


- if you have account on devolepers google, just on click dialgog ENABLE THE GMAIL API and create new proyect or choose exist proyect. from there page I get code for this example, below left the link on references.

- Dowload the configuration file and check the name file is credentials.json

2:

-create folder
mkdir your_proyect
cd your_proyect
-- run next command
gradle init --type basic
mkdir -p src/main/java src/main/resource
--Copy the credentials.json into src/main/resource


3: run your proyect with next command.


gradle -q run
Check de images when you run the project:


Result get my labels from my gmail.


References:

https://developers.google.com/gmail/api/quickstart/java


Wednesday, December 5, 2018

Manually Install Java on Ubuntu 18.04.1

How to manually install Java on Ubuntu:

Check next steps:

Step 1:

Download JDK from Oracle page, Link

https://www.oracle.com/technetwork/java/javase/downloads/java-archive-javase9-3934878.html

Step 2:

For example I'm install JDK 9, but others version is similar.

Choose  file --> .tar.gz


Step 3:

Extract file on next path.

/usr/lib/jvm

Step 4:

Run next comands:

sudo update-alternatives --install /usr/bin/java java /usr/lib/jvm/YOUR_JDK/bin/java 0
sudo update-alternatives --install /usr/bin/javac javac /usr/lib/jvm/YOUR_JDK/bin/javac 0
sudo update-alternatives --install /usr/bin/javaws javaws /usr/lib/jvm/YOUR_JDK/bin/javaws 0

Step 5: Configuration, Choose your version java, javac and javaws.

sudo update-alternatives --config java
sudo update-alternatives --config javac
sudo update-alternatives --config javaws

Check the image, below:


Friday, October 19, 2018

Adding trusted root certificates (CentOS Linux 7)

If you want add a trusted root certificate manually on CentOS.

Steps:

  1. Install the ca-certificates package: yum install ca-certificates
  2. Enable the dynamic CA configuration feature: update-ca-trust force-enable
  3. Add it as a new file to /etc/pki/ca-trust/source/anchors/: cp foo.crt /etc/pki/ca-trust/source/anchors/
  4. Use command: update-ca-trust extract


References:

https://manuals.gfi.com/en/kerio/connect/content/server-configuration/ssl-certificates/adding-trusted-root-certificates-to-the-server-1605.html

Thursday, October 18, 2018

Mensaje del Receptor FacturaciĆ³n electronica Costa Rica (Version 4.2 and 4.3)

Les comparto un ejemplo de como firmar XML y enviar JSON  mensaje receptor hacienda CR, los metodos genericos realizados tambien lo podrian utilizar para enviar Factura electronica, Tiquete Electronico, Notas de credito Etc. solo cambiando el schema que corresponda.


Tecnologias utilizadas.

1. Spring Boot 2.0.5.RELEASE
2. Maven 4
3. Java 8
4. Eclipse: Oxygen.1.a Release (4.7.1a)
5. Tomcat 8.5
6. Postman 6.4.4


Proyecto.


Insumos necesarios:

-Certificado .p12  + clave.
-clientId + usuario + contraseƱa --> para genera el token de seguridad.
-Url se encuentra en la pagina hacienda CR.

Cambiar datos en el proyecto.

1.  Importar proyecto Maven eclipse.
2.  messages.properties y FeMensajeReceptorRestController.java colocar datos correspondientes.
3. en el folder certificado colocar certificado.
4.  Run as -> Run on Server.
5. Probar con Postman.

Respuesta Hacienda.


Codigo en GitHub.


Referencias:

https://tribunet.hacienda.go.cr/FormatosYEstructurasXML.jsp
https://www.flecharoja.com/blog/2018-03/mensaje-receptor/
https://github.com/tim1991/facturaci-n-electronica-costarica-java


Tuesday, June 12, 2018

ERROR: ORA-28000: the account is locked (CentOS Linux 7)

I share solution the next error:

ERROR: 
ORA-28000: the account is locked

Steps:

Step 1:

Check if you have ORACLE_HOME in your environment, run next command.

echo $ORACLE_HOME

Result:


Step 2:

-If you have ORACLE_HOME  past step 3.

If you don't have ORACLE_HOME in your environment.

2.1 -> Find the directory oracle, where you were install.

2.2 -> export ORACLE_HOME=your_path_oracle 
Example: export ORACLE_HOME=/u01/app/oracle/product/11.2.0/xe

2.3 -> export PATH=your_path_oracle_bin:$PATH

Example: export PATH=/u01/app/oracle/product/11.2.0/xe/bin:$PATH

2.4 -> cd ~/
2.5 -> vim .bash_profile
2.6 ->  Add next lines in the end file.

ORACLE_SID=XE
export ORACLE_SID
ORACLE_HOME=your_path_oracle
#ORACLE_HOME=/u01/app/oracle/product/11.2.0/xe
export ORACLE_HOME
PATH=$ORACLE_HOME/bin:$PATH
export PATH

2.7 -> Save and exit. 
:wq

Check again if you have ORACLE_HOME in your environment.

Step 3: Run next command:

sqlplus sys/"YOUR_PASSWORD"@xe as sysdba


Step 4: Run next command:

alter user YOUR_USER account unlock;

Please check again your connection with your user unlock.


References:

http://techxploration.blogspot.com/2012/01/resolving-sp2-0750-you-may-need-to-set.html


Tuesday, May 29, 2018

Spring-Boot-Security-RestAPI-OAuth2 'JOT'

I Share Example, how to integrate Spring Boot, Security and RestAPI with OAuth2.

Technologies used:

1. Spring Boot 1.5.6.RELEASE
2. Maven 4
3. Java 8
4. Eclipse: Oxygen.1.a Release (4.7.1a)
5. Tomcat 8.5

Code on GitHub:

https://github.com/HenryXiloj/Spring-Boot-Security-RestAPI-OAuth2

Proyect.


Steps:

1. Import maven proyect in eclipse.

2. Right click on Spring-Boot-Security-RestAPI-OAuth2 project -Run as -> Run on Server.


3.  package: com.hxiloj.controller -> RestClient.java -> Right click on Class -> Run as -> Java Application


References: http://websystique.com/spring-security/secure-spring-rest-api-using-oauth2/


Thursday, April 19, 2018

Integration spring-boot-security-dataJPA-oauth2-google-angular5

I share basic example, how to integrate Spring-boot-security-dataJPA-oauth2-googe with angular 5

Technologies used:

1. Spring Boot 2.0.1.RELEASE
2. Oracle (Ojdbc) 11.2.0.4
3. Tomcat Embed
4. Maven 4
5. Java 8
6. Angular CLI: 1.7.4
7. Node: 8.9.4
8. Eclipse: Oxygen.1.a Release (4.7.1a)


Steps:

1. Create your project in google for get your clientId and clientSecret, we need both for use OAuth2 with google.  go to 

https://console.developers.google.com

And create your project and credentials for OAuth2

check images.


2. In Backend App -> file application.yml set your Client ID and Client secret

Check image.


3. Import projects in eclipse then your import backend project: 

Right click on backend project -Show in -> Terminal.

build and run the SpringBoot server again with commands:

– Build: mvn clean install

– Run:  mvn spring-boot:run


4. if you want to know, how to integrate step to step spring boot with angular 5
check my blog: http://jarmx.blogspot.com/2018/04/integration-springboot-springdatajpa.html


5. if you to do the steps succes then. -request url: http://localhost:8080/google/login

check images:


Code on GitHub: 

Backend: https://github.com/HenryXiloj/spring-boot-security-dataJPA-oauth2-google
Front-end: https://github.com/HenryXiloj/angular5-front-end


References: https://dzone.com/articles/build-a-secure-spa-with-spring-boot-and-oauth


Wednesday, April 18, 2018

ORA-01034: ORACLE not available, ORA-27101: shared memory realm does not exist

I share solution the next error:

ERROR:
ORA-01034: ORACLE not available
ORA-27101: shared memory realm does not exist
Linux-x86_64 Error: 2: No such file or directory
Process ID: 0
Session ID: 0 Serial number: 0

Steps:

Step 1:

Connect user from linux or unix.

*oracle is my user.

sudo su - oracle

* set your password.
* if you don't remmeber your password change password with the next command.

sudo passwd oracle

Step 2:

Use the lsnrctl command to start service

lsnrctl start

Step 3:

Start database:

dbstart

* Try connect your database.
* if you have the next error: try with the step 4.


Step 4:

* Try to login sysdba user:

sqlplus '/ as sysdba'


Step 5:

* Type startup command:

startup.

* Try connect your database

Check image below with commands:


Great :).


References: https://www.cyberciti.biz/faq/how-do-i-start-oracle-service-in-unix/


Wednesday, April 11, 2018

Create maven archetype from existing project

I share basic example, how to create maven archetype from existing project.

Steps:

Step 1.

-cd your_project

run next command: mvn archetype:create-from-project


It then generates the directory tree of the archetype in the target/generated-sources/archetype directory.
Step 2. Move directory.

- cd target/generated-sources/archetype/

- And run command mvn install


Step 3. Move to a fresh directory and use your archetype.

- mkdir /tmp/archetype

- cd /tmp/archetype

- mvn archetype:generate -DarchetypeCatalog=local


References: https://maven.apache.org/archetype/maven-archetype-plugin/advanced-usage.html


Monday, April 9, 2018

Integration-SpringBoot-SpringDataJPA-Angular5

I share basic example, how to integrate Spring Boot - SpringDataJPA-Angular5


Technologies used:


1. Spring Boot 2.0.1.RELEASE
2. Oracle (Ojdbc) 11.2.0.4
3. Tomcat Embed
4. Maven 4
5. Java 8
6. Angular CLI: 1.7.4
7. Node: 8.9.4
8. Eclipse: Oxygen.1.a Release (4.7.1a)

Steps:

1. Create project angular


if you want to test and start application,  you have to run the next command in your console.


Open your browser: http://localhost:4200/

2. Import your project angular to eclipse:

Import -> General -> Projects from Folder or Archieve -> Directory, press finish


3. To clean the sourcecode in STS, we need to remove node_modules:
– Right click on angular5-client project, choose Properties, then choose:  Resource --> Resource Filter.
– Press Add Filter, choose Filter Type, press OK -> Apply and Close


4. Create a file proxy.conf.json


{

"/ws": {

"target": "http://localhost:8080",

"secure": false

}
}


5. Edit package.json file for “start” script:

Edit next line: "start": "ng serve --proxy-config proxy.conf.json",


6. Right click on angular5-client project
  -Show in -> Terminal.

 Build angular5 client with command  ng build --env=prod


Result is a dist folder:


7. References folder dist from pom.xml Eclipse project.


8. build and run the SpringBoot server again with commands:

– Build: mvn clean install


– Run:  mvn spring-boot:run


--request url from test: http://localhost:8080/


--


request url web service rest: http://localhost:8080/ws/read


Code on GitHub: 

Backend: https://github.com/HenryXiloj/SpringBoot-SprinDataJPA
Front-end: https://github.com/HenryXiloj/angular5-client


References: http://javasampleapproach.com/java-integration/integrate-angular-4-springboot-web-app-springtoolsuite


Automating Deployments with CronJobs in Google Kubernetes Engine (GKE)

In the realm of container orchestration, automation plays a pivotal role in streamlining operations. Google Kubernetes Engine (GKE) offers r...