Saturday, March 28, 2020

Kotlin + OAuth2 + JWT + SpringBoot2 + JPA

I share example how to integrate Kotlin + OAuth2 + Spring Rest API + SpringBoot 2  + JWT +JPA.

Technologies used:

1. Spring Boot 2.2.6.RELEASE
2. Maven
3. OAuth2
4. Intellij IDEA Community
5. Spring Tools Suite (STS) 4
6. MySql
7. Postman

Code on GitHub:

https://github.com/HenryXiloj/Kotlin-OAuth2-SpringBoot2-JPA

Steps:


Create table on MySql:

CREATE TABLE `users` 
( 
 `id`       INT(11) NOT NULL auto_increment, 
 `username` VARCHAR(255) NOT NULL, 
 `password` VARCHAR(255) NOT NULL, 
 `created` TIMESTAMP NOT NULL DEFAULT CURRENT_TIMESTAMP() on 
  UPDATE CURRENT_TIMESTAMP(), 
  PRIMARY KEY (`id`) 
)


I saved the password field with Security - Password Enconding (org.springframework.security.crypto.bcrypt.BCryptPasswordEncoder)

INSERT INTO users 
VALUES      (1, 
             'henry', 
             '$2a$04$I9Q2sDc4QGGg5WNTLmsz0.fvGv3OjoZyj81PrSFyGOqMphqfS2qKu'); 


IntelliJ:  File -> open --> choose folder backend


Change the configuration on file application.yml


Run project from IntelliJ :

View -> Tool Windows -> Maven -> Execute Maven Goal-> mvn install


Run project backend.jar with java -jar backend.jar,  in the file configuration you can define context for application, i define context --> backend and port 9000.


Credencials for test:


Test: Get token


Test: Error when you try to access ws, you need to add access_token


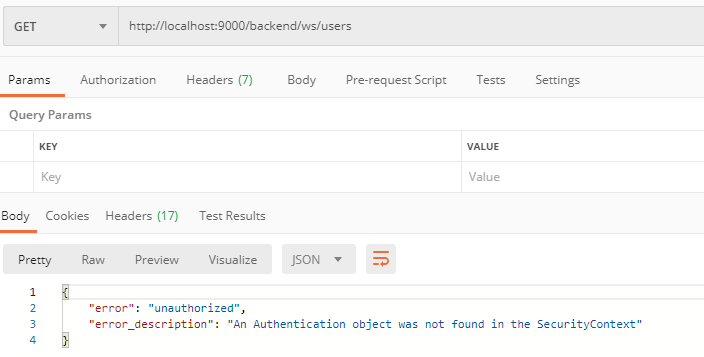
Add access_token -> url?access_token=your_token.


References:
https://www.devglan.com/spring-security/spring-boot-security-oauth2-example


Wednesday, March 25, 2020

Configure Tomcat reverseproxy https to http

If your site using https and you need to access http tomcat, you need to make reverseproxy.

Edit file conf/server.xml and add yellow paragraph:

<Connector port="8080" protocol="HTTP/1.1"
               connectionTimeout="20000"
               proxyName="server.company.com" scheme="https" secure="true" proxyPort="443" />


Restart tomcat.

Try again.


References:
https://serverfault.com/questions/742922/configure-tomcat-behind-reverseproxy


Thursday, March 19, 2020

GIT Tips


1.  Install git

sudo apt install git

2. create file .ssh

sudo mkdir /home/your_user/.ssh  

3. On folder .ssh run next command, (enter and enter doesn't write anything).

ssh-key

4. copy content on file id_rsa.pub

cat /home/your_user/.ssh/id_rsa.pub

5. Open in your browser GitHub or GitLab

GitHub: https://github.com/settings/keys  -> New SSH key

GitLab:https://your_ip_or_hostname/profile/keys --> Add and SSH Key

6. Clone branch or specific branch

Any branch:
git clone <remote-repo>
Specific branch:
git clone --single-branch --branch <branchname> <remote-repo>

8. Discard unstaged changes

git stash

9. Git Checkout Specific file

git checkout <branch_name> -- <paths>

10. Override comment in commit

git commit --amend -m "My_new_comment"

11. Remove local commits

git reset --hard origin/<branch_name>

12. To rollback to commit

git reset --hard sha1_id

13. Create GitHub Branch from Commit

Clone the Repository:
git clone https://github.com/your-username/your-repository.git
cd your-repository
Find the Commit Hash:
git log
Create a New Branch:
git checkout -b new-branch-name commit-hash
Push the New Branch to GitHub:
git push origin new-branch-name

14. Pull All Branches Automatically

To configure your Git repository to automatically track all remote branches, you can set the following:

git config remote.origin.fetch "+refs/heads/*:refs/remotes/origin/*"
git fetch origin

This ensures that all remote branches are fetched and mirrored locally.

15. Long path file:

git config --system core.longpaths true

17. Recovery

git stash list

git stash apply stash@{0}   # most recent
git stash apply stash@{6}   # oldest 6 = n


Wednesday, March 4, 2020

Please check if the configured key or specified key file is a valid SSH Private Key - Rancher Kubernetes

Solution next error Rancher on Centos8:

Please check if the configured key or specified key file is a valid SSH Private Key. Error: Error configuring SSH: ssh: no key found


Steps:

WORKSTATION.

Save the key of your nodes on workstation.

Step 1 — Create the RSA Key Pair


ssh-keygen

Enter and enter doesn't write anything.

Step 2 — Copy the Public Key to CentOS Server


ssh-copy-id username@remote_host

Copying Public Key Using SSH

cat ~/.ssh/id_rsa.pub | ssh username@remote_host "mkdir -p ~/.ssh && touch ~/.ssh/authorized_keys && chmod -R go= ~/.ssh && cat >> ~/.ssh/authorized_keys"


Check connect with ssh without password.


References:


Saturday, February 29, 2020

MySQL - Create user, Database and access remote(CentOS 7)

When you need to create a new user on mysql you need to login with user root, for that you need to login from console use the next command.

mysql -u user -p your_password


Create user.


*Localhost

CREATE USER 'your_user'@'localhost' IDENTIFIED BY 'your_password';
GRANT ALL PRIVILEGES ON *.* TO 'your_user'@'localhost' WITH GRANT OPTION;

*RemoteAccess 

CREATE USER 'your_user'@'your_ip' IDENTIFIED BY 'your_password';
GRANT ALL PRIVILEGES ON *.* TO 'your_user'@'your_ip' WITH GRANT OPTION;
FLUSH PRIVILEGES;

Note: if the access is denied still when you run command line above then you need the configuration file /etc/my.cnf and add next line on the file bind-address:your_ip. and then you need tu restart mysql.

#mysql
systemctl restart mysql 

#mariadb
systemctl restart mariadb.service

Next: open the required port 3306, run the next command.

iptables -A INPUT -i eth0 -p tcp --destination-port 3306 -j ACCEPT

In the end: Save the iptables configuration

service iptables save

Create Databases.


CREATE DATABASE your_database;


GRANT ALL PRIVILEGES ON your_database.* TO 'your_user'@'localhost';


References:
https://linuxize.com/post/how-to-create-mysql-user-accounts-and-grant-privileges/
https://www.inmotionhosting.com/support/website/how-to-create-a-database-using-mysql-from-the-command-line/
https://www.hostinger.com/tutorials/mysql/how-to-grant-remote-access-mysql-vps
https://support.infrasightlabs.com/article/host-is-not-allowed-to-connect-to-this-mysql-server/
https://serverfault.com/questions/626922/no-mysqld-or-mysql-server-after-mariadb-server-install


Monday, February 17, 2020

Installing Java 8 on CentOS 7


Installing Java 8 on CentosOS 7.

Steps:

Step 1: Update

yum -y update

Step 2: Install Java 8


yum install java-1.8.0-openjdk


Step 3:  Verify Java is Installed

java -version


Step 4: Java alternatives (choose Java 1.8..)


update-alternatives --config java

update-alternatives --config javac

update-alternatives --config javaws


Step 5: Environment

vim .bash_profile

Inside on file, copy path your jdk, example:

export JAVA_HOME=/usr/lib/jvm/YOUR_JDK/jre/bin/java


Refresh the File:
Source .bash_profile

echo $JAVA_HOME


Thursday, January 23, 2020

SSO OAuth2 Spring Boot2 Security JDBC Authentication


I share example how to integration OAuth2 - Spring Boot2 - Security - JDBC Authentication.


Technologies used:

1. Spring Boot 2.0.3.RELEASE
2. Maven 4
3. Java 8
4. OAuth2
5. Eclipse: Oxygen.1.a Release (4.7.1a)
6. Spring Tools Suite (STS) 4
7. MySql

Code on GitHub:

https://github.com/HenryXiloj/SSO-OAuth2-SpringBoot2-JDBC

Steps:

Step 1:

Create tables on mysql:

CREATE TABLE users 
  ( 
     username VARCHAR(50) NOT NULL PRIMARY KEY, 
     password VARCHAR(100) NOT NULL, 
     enabled  BOOLEAN NOT NULL 
  ); 

CREATE TABLE authorities 
  ( 
     username  VARCHAR(50) NOT NULL, 
     authority VARCHAR(50) NOT NULL, 
     CONSTRAINT fk_authorities_users FOREIGN KEY(username) REFERENCES users( 
     username) 
  ); 

CREATE UNIQUE INDEX ix_auth_username ON authorities (username, authority); 


Step 2: Insert your user, example:

For insert password on Databases you need to passwordEncoder, for example use Test.java for generate passwordEncoder:


Resul is : $2a$08$sqfU5.UM.oEqgzVniREsvOsQ9eDtSD/xX8RXT2Bc4AmXWHo4fcchG


INSERT INTO users 
VALUES      ('henry', 
             '$2a$08$ykZFaf/pmTxnShaj5dqXZeWXiK3JJSJr5f20hqiVGSO35KNyQ0lgO' 
             /*123*/, 
             true); 

INSERT INTO authorities 
            (username, 
             authority) 
VALUES     ('henry', 
            'ROLE_ADMIN'); 


Step 3:

On the proyect spring-security-sso-auth-server change the configuration in application.yml


Step 4:

Run 2 proyects on Eclipse or if you prefer use command line on console:

First: auth server

Righ click on proyect -> Run As -> Spring Boot App

Expose on port: 8081


Second: sso-ui

Expose on port: 8082


Step 5:

http://localhost:8082/ui/


References:

https://www.baeldung.com/sso-spring-security-oauth2
https://www.baeldung.com/spring-security-jdbc-authentication
https://mkyong.com/spring-security/spring-security-form-login-using-database/


🚀 Spring Boot 3.5 → 4.0.3 Migration Summary

Import Changes, API Adjustments & Compatibility Results Migration summary from Spring Boot 3.5 → 4.0, including breaking changes, depend...