I share example how java Transformer outputs < and > instead of <> on XML.
/**
Example
*/
import java.io.StringReader;
import java.io.StringWriter;
import javax.xml.parsers.DocumentBuilder;
import javax.xml.parsers.DocumentBuilderFactory;
import javax.xml.transform.OutputKeys;
import javax.xml.transform.Transformer;
import javax.xml.transform.TransformerFactory;
import javax.xml.transform.dom.DOMSource;
import javax.xml.transform.stream.StreamResult;
import org.apache.commons.lang.StringEscapeUtils;
import org.w3c.dom.Document;
import org.xml.sax.InputSource;
public class Test {
public static void main(String[] args) throws Exception {
// TODO Auto-generated method stub
String xml = "<?xml version=\"1.0\" encoding=\"UTF-8\" standalone=\"yes\"?>" +
"<company>" +
"<staff id=\"1001\">" +
"<firstname>henry</firstname>" +
"</staff>" +
"</company>";
DocumentBuilderFactory dbFactory = DocumentBuilderFactory.newInstance();
DocumentBuilder dBuilder = dbFactory.newDocumentBuilder();
Document doc = dBuilder.parse(new InputSource(new StringReader(StringEscapeUtils.unescapeXml(xml.toString()))));
System.out.println("final xml " + xmlTransformerInput(doc).toString());
}
public static String xmlTransformerInput(Document fDoc) {
try {
fDoc.setXmlStandalone(true);
DOMSource docSource = new DOMSource(fDoc);
Transformer transformer = TransformerFactory.newInstance().newTransformer();
transformer.setOutputProperty(OutputKeys.METHOD, "xml");
transformer.setOutputProperty(OutputKeys.ENCODING, "UTF-8");
transformer.setOutputProperty(OutputKeys.INDENT, "yes");
StringWriter sw = new StringWriter();
transformer.transform(docSource, new StreamResult(sw));
return sw.toString();
} catch (Exception e) {
e.printStackTrace();
return null;
}
}
}
Friday, March 22, 2019
Wednesday, March 13, 2019
Create new Database from command line Oracle 11g Express
I share example how to create new user from command line, you need SQL*Plus or JDeveloper and super user, I'm using Oracle 11g Express for that use the user SYSTEM.
Steps:
Step 1:
connect SYSTEM/password;
Step 2:
CREATE USER your_schema IDENTIFIED BY your_password;
Step 3:
ALTER USER your_schema QUOTA UNLIMITED ON SYSTEM;
Step 4:
GRANT CREATE SESSION, CONNECT, RESOURCE, DBA TO your_schema;
Step 5:
GRANT ALL PRIVILEGES TO your_schema;
You try connect with the new user.
That's it.
Monday, March 4, 2019
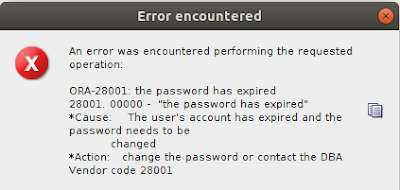
ORA-28001: The password has expired
I share solution next error:
Steps:
1. First connect from SQL Developer or SQL PLUS. Use the user SYSTEM or SYSDBA
2. SQL> connect / as SYSDBA
3. Run next query:
SELECT username,
account_status
FROM dba_users
WHERE account_status LIKE '%EXPIRED%';
4. Find your User and Check account_status
5. And the last. alter the table with next query
ALTER USER your_user IDENTIFIED BY your_new_or_same_password account unlock;
That is it.
Wednesday, December 26, 2018
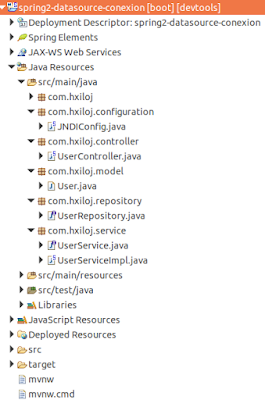
spring2-jndi-datasource-conexion
I share example, Spring Boot2 jndi datasource conexion from Tomcat.
Technologies used:
1. Spring Boot 2.0.3.RELEASE
2. Maven 4
3. Java 9
4. Eclipse: Oxygen.1.a Release (4.7.1a)
5. Tomcat 9
6. MySql 5.7.24
Technologies used:
1. Spring Boot 2.0.3.RELEASE
2. Maven 4
3. Java 9
4. Eclipse: Oxygen.1.a Release (4.7.1a)
5. Tomcat 9
6. MySql 5.7.24
Code on GitHub:
https://github.com/HenryXiloj/Spring-boot2-jndi-datasource-conexion
Steps:
1. Create table and insert on table.
CREATE TABLE `user` (
`id` bigint(20) NOT NULL,
`name` varchar(45) DEFAULT NULL,
`email` varchar(45) DEFAULT NULL,
PRIMARY KEY (`id`)
) ENGINE=InnoDB DEFAULT CHARSET=latin1;
INSERT INTO `user` (`id`, `name`, `email`) VALUES ('1', 'Henry', 'test@gmail.com');
INSERT INTO `user` (`id`, `name`, `email`) VALUES ('2', 'Lucas', 'test2@gmail.com');
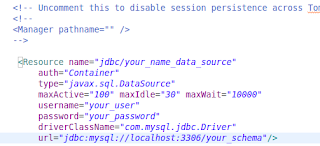
2. Add in your context.xml (path_your_tomcat9/conf/context.xml).
3. Import maven project from eclipse.
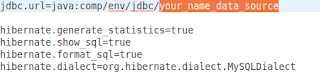
4. edit configuration file application.properties

https://github.com/HenryXiloj/Spring-boot2-jndi-datasource-conexion

Steps:
1. Create table and insert on table.
CREATE TABLE `user` (
`id` bigint(20) NOT NULL,
`name` varchar(45) DEFAULT NULL,
`email` varchar(45) DEFAULT NULL,
PRIMARY KEY (`id`)
) ENGINE=InnoDB DEFAULT CHARSET=latin1;
INSERT INTO `user` (`id`, `name`, `email`) VALUES ('1', 'Henry', 'test@gmail.com');
INSERT INTO `user` (`id`, `name`, `email`) VALUES ('2', 'Lucas', 'test2@gmail.com');
2. Add in your context.xml (path_your_tomcat9/conf/context.xml).

3. Import maven project from eclipse.
4. edit configuration file application.properties

5. Run As -> Run on Server
6. Test: http://localhost:8080/spring2-datasource-conexion/user
References:
https://www.baeldung.com/spring-persistence-jpa-jndi-datasource
Monday, December 10, 2018
Spring-boot2-pool-conexion
I share example, Spring Boot2 pool conexion from Tomcat.
Technologies used:
1. Spring Boot 2.0.3.RELEASE
2. Maven 4
3. Java 9
4. Eclipse: Oxygen.1.a Release (4.7.1a)
5. Tomcat 9
6. MySql 5.7.24
Steps:
1. Create table and insert on table.
CREATE TABLE `user` (
`id` bigint(20) NOT NULL,
`name` varchar(45) DEFAULT NULL,
`email` varchar(45) DEFAULT NULL,
PRIMARY KEY (`id`)
) ENGINE=InnoDB DEFAULT CHARSET=latin1;
INSERT INTO `user` (`id`, `name`, `email`) VALUES ('1', 'Henry', 'test@gmail.com');
INSERT INTO `user` (`id`, `name`, `email`) VALUES ('2', 'Juan', 'test2@gmail.com');
2. Import maven project from eclipse.
3. edit configuration file .yml

4. Run As -> Run on Server
5. For test: http://localhost:8080/spring2-pool-conexion/user

Code on GitHub:
https://github.com/HenryXiloj/Spring-boot2-pool-conexion
https://github.com/HenryXiloj/Spring-boot2-pool-conexion
References:
https://www.concretepage.com/spring-boot/spring-boot-tomcat-connection-pool
Friday, December 7, 2018
ERROR 1698 (28000): Access denied for user 'root'@'localhost'
I share solution the next error: ERROR 1698 (28000): Access denied for user 'root'@'localhost'
1. When you create new install mysql use 'sudo' on ubuntu.
2. First connect you db from command line.

sudo mysql -u root
3.

SELECT User, Host, plugin from mysql.user;
if you check User 'root' have 'auth_sockect' update to 'mysql_native_password'
4. in your case User='root'

5. FLUSH PRIVILEGES;
6. exit;
Try again.
References:
https://stackoverflow.com/questions/39281594/error-1698-28000-access-denied-for-user-rootlocalhost
1. When you create new install mysql use 'sudo' on ubuntu.
2. First connect you db from command line.
sudo mysql -u root
3.

SELECT User, Host, plugin from mysql.user;
if you check User 'root' have 'auth_sockect' update to 'mysql_native_password'
4. in your case User='root'
5. FLUSH PRIVILEGES;
6. exit;
Try again.
References:
https://stackoverflow.com/questions/39281594/error-1698-28000-access-denied-for-user-rootlocalhost
Thursday, December 6, 2018
Example consuming Gmail API
I share basic example, how to integrate Gmail API with Gradle
Technologies used:
1. Spring Tools Suite
4. Gradle 3.4.1
5. Java 8
8. Eclipse: Oxygen.1.a Release (4.7.1a)
Technologies used:
1. Spring Tools Suite
4. Gradle 3.4.1
5. Java 8
8. Eclipse: Oxygen.1.a Release (4.7.1a)
Code on GitHub: https://github.com/HenryXiloj/api-gmail
Steps:
1:
Create credentials:
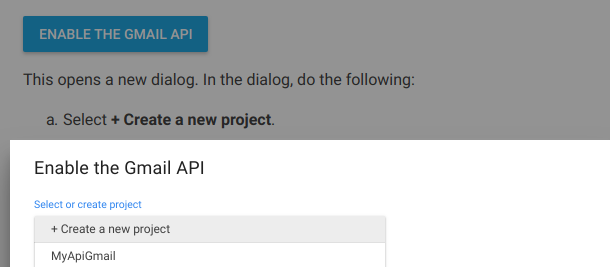
- if you have account on devolepers google, just on click dialgog ENABLE THE GMAIL API and create new proyect or choose exist proyect. from there page I get code for this example, below left the link on references.
- Dowload the configuration file and check the name file is credentials.json
2:
-create folder
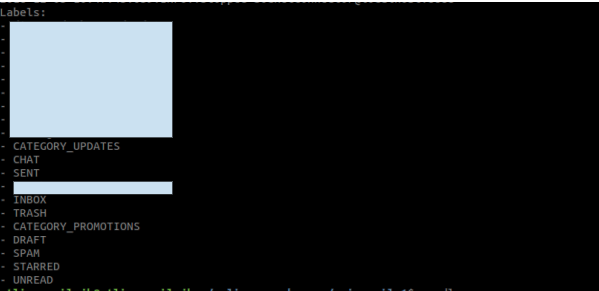
3: run your proyect with next command.
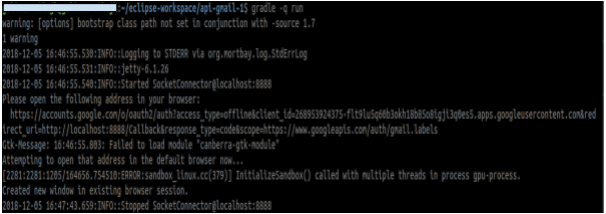
Result get my labels from my gmail.
References:
https://developers.google.com/gmail/api/quickstart/java
Steps:
1:
Create credentials:

- if you have account on devolepers google, just on click dialgog ENABLE THE GMAIL API and create new proyect or choose exist proyect. from there page I get code for this example, below left the link on references.
- Dowload the configuration file and check the name file is credentials.json
2:
-create folder
mkdir your_proyect
cd your_proyect-- run next command
gradle init --type basicmkdir -p src/main/java src/main/resourcegradle -q run
Result get my labels from my gmail.

References:
https://developers.google.com/gmail/api/quickstart/java
Subscribe to:
Posts (Atom)
🚀 Spring Boot 3.5 → 4.0.3 Migration Summary
Import Changes, API Adjustments & Compatibility Results Migration summary from Spring Boot 3.5 → 4.0, including breaking changes, depend...

-
SAML V2.0 SAML version 2.0 was approved as an OASIS Standard in March 2005. Approved Errata for SAML V2.0 was last produced by the SSTC on 1...
-
Spring Boot 3 Spring boot 3 Features : Spring Boot 3.0 will require Java 17 or later Jakarta EE 9 a new top-level jakarta package, replacin...
-
 Introduction: Sometimes we need to interact with Spring Boot GraphQL API and Spring Boot Rest API in the same time, in this case we can use ...

